Quantcast
Channel: Viget Articles
Viewing all 935 articles
Browse latest View live

Design Systems: Why Now?

$
0
0

Design Systems have been a hot topic as of late—so fiery hot that books are being written, platforms developed, events organized, and tools released to help us all with this growing need. To me, it feels a lot like a ‘what’s old is new again’ kind of topic. I mean, if we’re being real, the notion of systems design has been around since at least the industrial era—it’s not exclusive to the digital age. And, in many ways, Design Systems by their very nature are simply a natural evolution of style guides—a set of standard guidelines for writing and design. Yet, style guides have been around for decades. So, why the newness and why now?

As an agency, we’re not here to define what Design Systems are and are not—there are already tons of articles that do so. If you’re looking good starting places, I recommend Laura Kalbag’s Design Systems article (short form, 2012) and Invision’s Design System Handbook (long form, 2017). We’re interested in helping organizations, like our customers, better understand why they might need a Design System and how best to get started. With that in mind, this is the beginning of a small set of articles to give you an idea of how we (and other client services providers like us) can help.

To look deeper into why there seems to be a rising interest in Design Systems, here are a few factors that may be driving things right now:

  • Digital is pervasive. Where there used to be a separation between offline and online, there is no more. Businesses that were offline are now online and businesses that started online are expanding beyond. We’re even starting to see digital agencies (like Stink Studios) drop Digital from their name (formerly Stink Digital). This is happening because most agencies now serve ‘digital’—it’s no longer a separate thing. Some agencies are now using descriptive words like ‘integrated’ to mean they service both online and offline needs.
  • More specialized capabilities are being brought in-house. As companies have hired more and more developers, they’ve built strong engineering departments. Once that happens, it doesn’t take long for a few engineers to tell you that they are not designers. And, once you hire designers it won’t take long for a designer to tell you what kind of designer they are. Suddenly, you are hiring for specialties like Visual, UI, UX, Interactive, Motion, Sound, and more.
  • Agile development is widespread. It used to be that websites would go through extensive overhauls every two to five years to account for evolving needs. Once developers adopted agile processes they trained others outside of development to work in similar rapid release cycles. What used to amount to a big launch every few years has evolved from bi-annual to bi-weekly to twice daily all the way to the point where things are closer and closer to being real-time events—make a change, validate, then publish.
  • Platforms are expanding. At one point in time we were designing for a single digital presence—the website. Then, it was sites and apps across a universe of displays—from wristwatches to stadium displays. Lately, what we see emerging are fully immersive extended reality (XR) environments—that’s just one side of the coin. On the other, displays are becoming non-essential thanks to voice-activated digital assistants like Amazon’s Alexa and Apple’s Siri. Put simply, it’s a lot to keep up with and stay ahead of.
  • Consumer expectations are rising. The most successful brands are trusted by their customers because of their attention to detail, whether it be customer service, user experience, or overall impact. The more consistent and polished your brand is across your universe of touch points, the more likely it is that you are trusted no matter where you are.

To summarize, what I think we’re seeing is a natural evolution of a maturing era. Though it is still evolving, it is no longer emerging. For many of us, we’re at a point in time where we can celebrate progress, but also recognize the messes made along the way, as is natural after a significant growth period. It’s times like these that we take what we have and make things better, more efficient, and more effective—a very real promise that Design Systems offer.

References

This being the start of a short series on this topic, we’re going to leave it here for now—so stay tuned for more from us about Design Systems. In the meantime, here are some references we’ve found helpful if you’d like to dive deeper.

Books

Articles

Podcasts

Lists

Examples


Detecting Motion with PIR Sensors

$
0
0

Recently we needed to determine whether or not movement was occurring in the nearby vicinity of a device. The application was to be used for an interactive art installation (which you can read more about at viget.com/lightwalk), where motion would trigger the activation of lights. We considered a wide array of components to do the job, but ultimately landed on using Passive Infrared Sensors (PIR for short). Here, I'll explain the process by which we got our PIR sensors to report momentary and sustained movement.

The Task

What is it that we wanted exactly? Detect when motion occurs in front of the sensor (between 1 and 10 feet), and continue to detect the motion for as long as it occurs. This covers the two main use cases we were designing for - casually walking by the sensor, and dancing like a maniac (a maaaaniac) in front of the sensor.

The Existing Tech

This is, not surprisingly, a problem that's been solved time and time again. So much so that there are really great proto-boards available to dip your toes into PIR with (ie: SparkFun OpenPIR). PIR sensors are commonly used to power deck and garage lighting that needs to activate whenever motion occurs in some specific area, and they work in pretty much all environmental circumstances (night, day, cloudy, sunny, etc.) Side note: the science behind how PIR sensors work is roughly a cross between infrared waves and the eye of a bug, here's a pre-assembled Wikipedia rabbit hole for you: PIR ->Fresnal Lense ->Anthropod Eye.

Unfortunately for us, we couldn't use an off-the-shelf solution for a number of reasons, mainly that they had to live outside, be tiny, and mount to the side of a 1-inch tube. We ultimately sprung for a batch of industrial PIR sensors, those that are built small and capable of handling all sorts of weather, and then set about determining which one detected motion in the desired focal area.

The Experimentation

We rigged up six different sensors to a pole, and logged the readings each sensor spat out while a coworker made crazy dance motions along a grid (video proof). We then plotted the readings on a spreadsheet and color coded the results to determine where each sensor's sweet spot of motion detection was:

three-sensors

It's not every day that you get to do Actual Science as a software developer! The dark purple blocks represents a "strong" reading, and the graphs here show the results from the three most promising sensors. We ended up going with sensor #1 as it offered the best detection for "right in front of the thing". All this goes to show that every type of sensor behaves differently depending on what kind of lens is fixed to it, and you should pick the one that best suits your needs. (for those curious, we ended up with this one)

The Fine Tuning

Now came the fun part (for me at least) - the coding! PIR sensors output their perception of the world by way of an analog value, a number between 0 and 4096 that describes ... something. That something isn't as straightforward as "a high number means motion is happening" unfortunately. In fact, when something moves drastically in front of a PIR sensor, that analog value moves high and low rather slowly. The graphs above were filled with the lowest value recorded in a set time period, a rudimentary method for detecting motion.

Let's take a look at some graphs visualizing the raw output of a few different scenarios (each graph represents ~7 seconds of time):

Flatline - no motion detected

flat
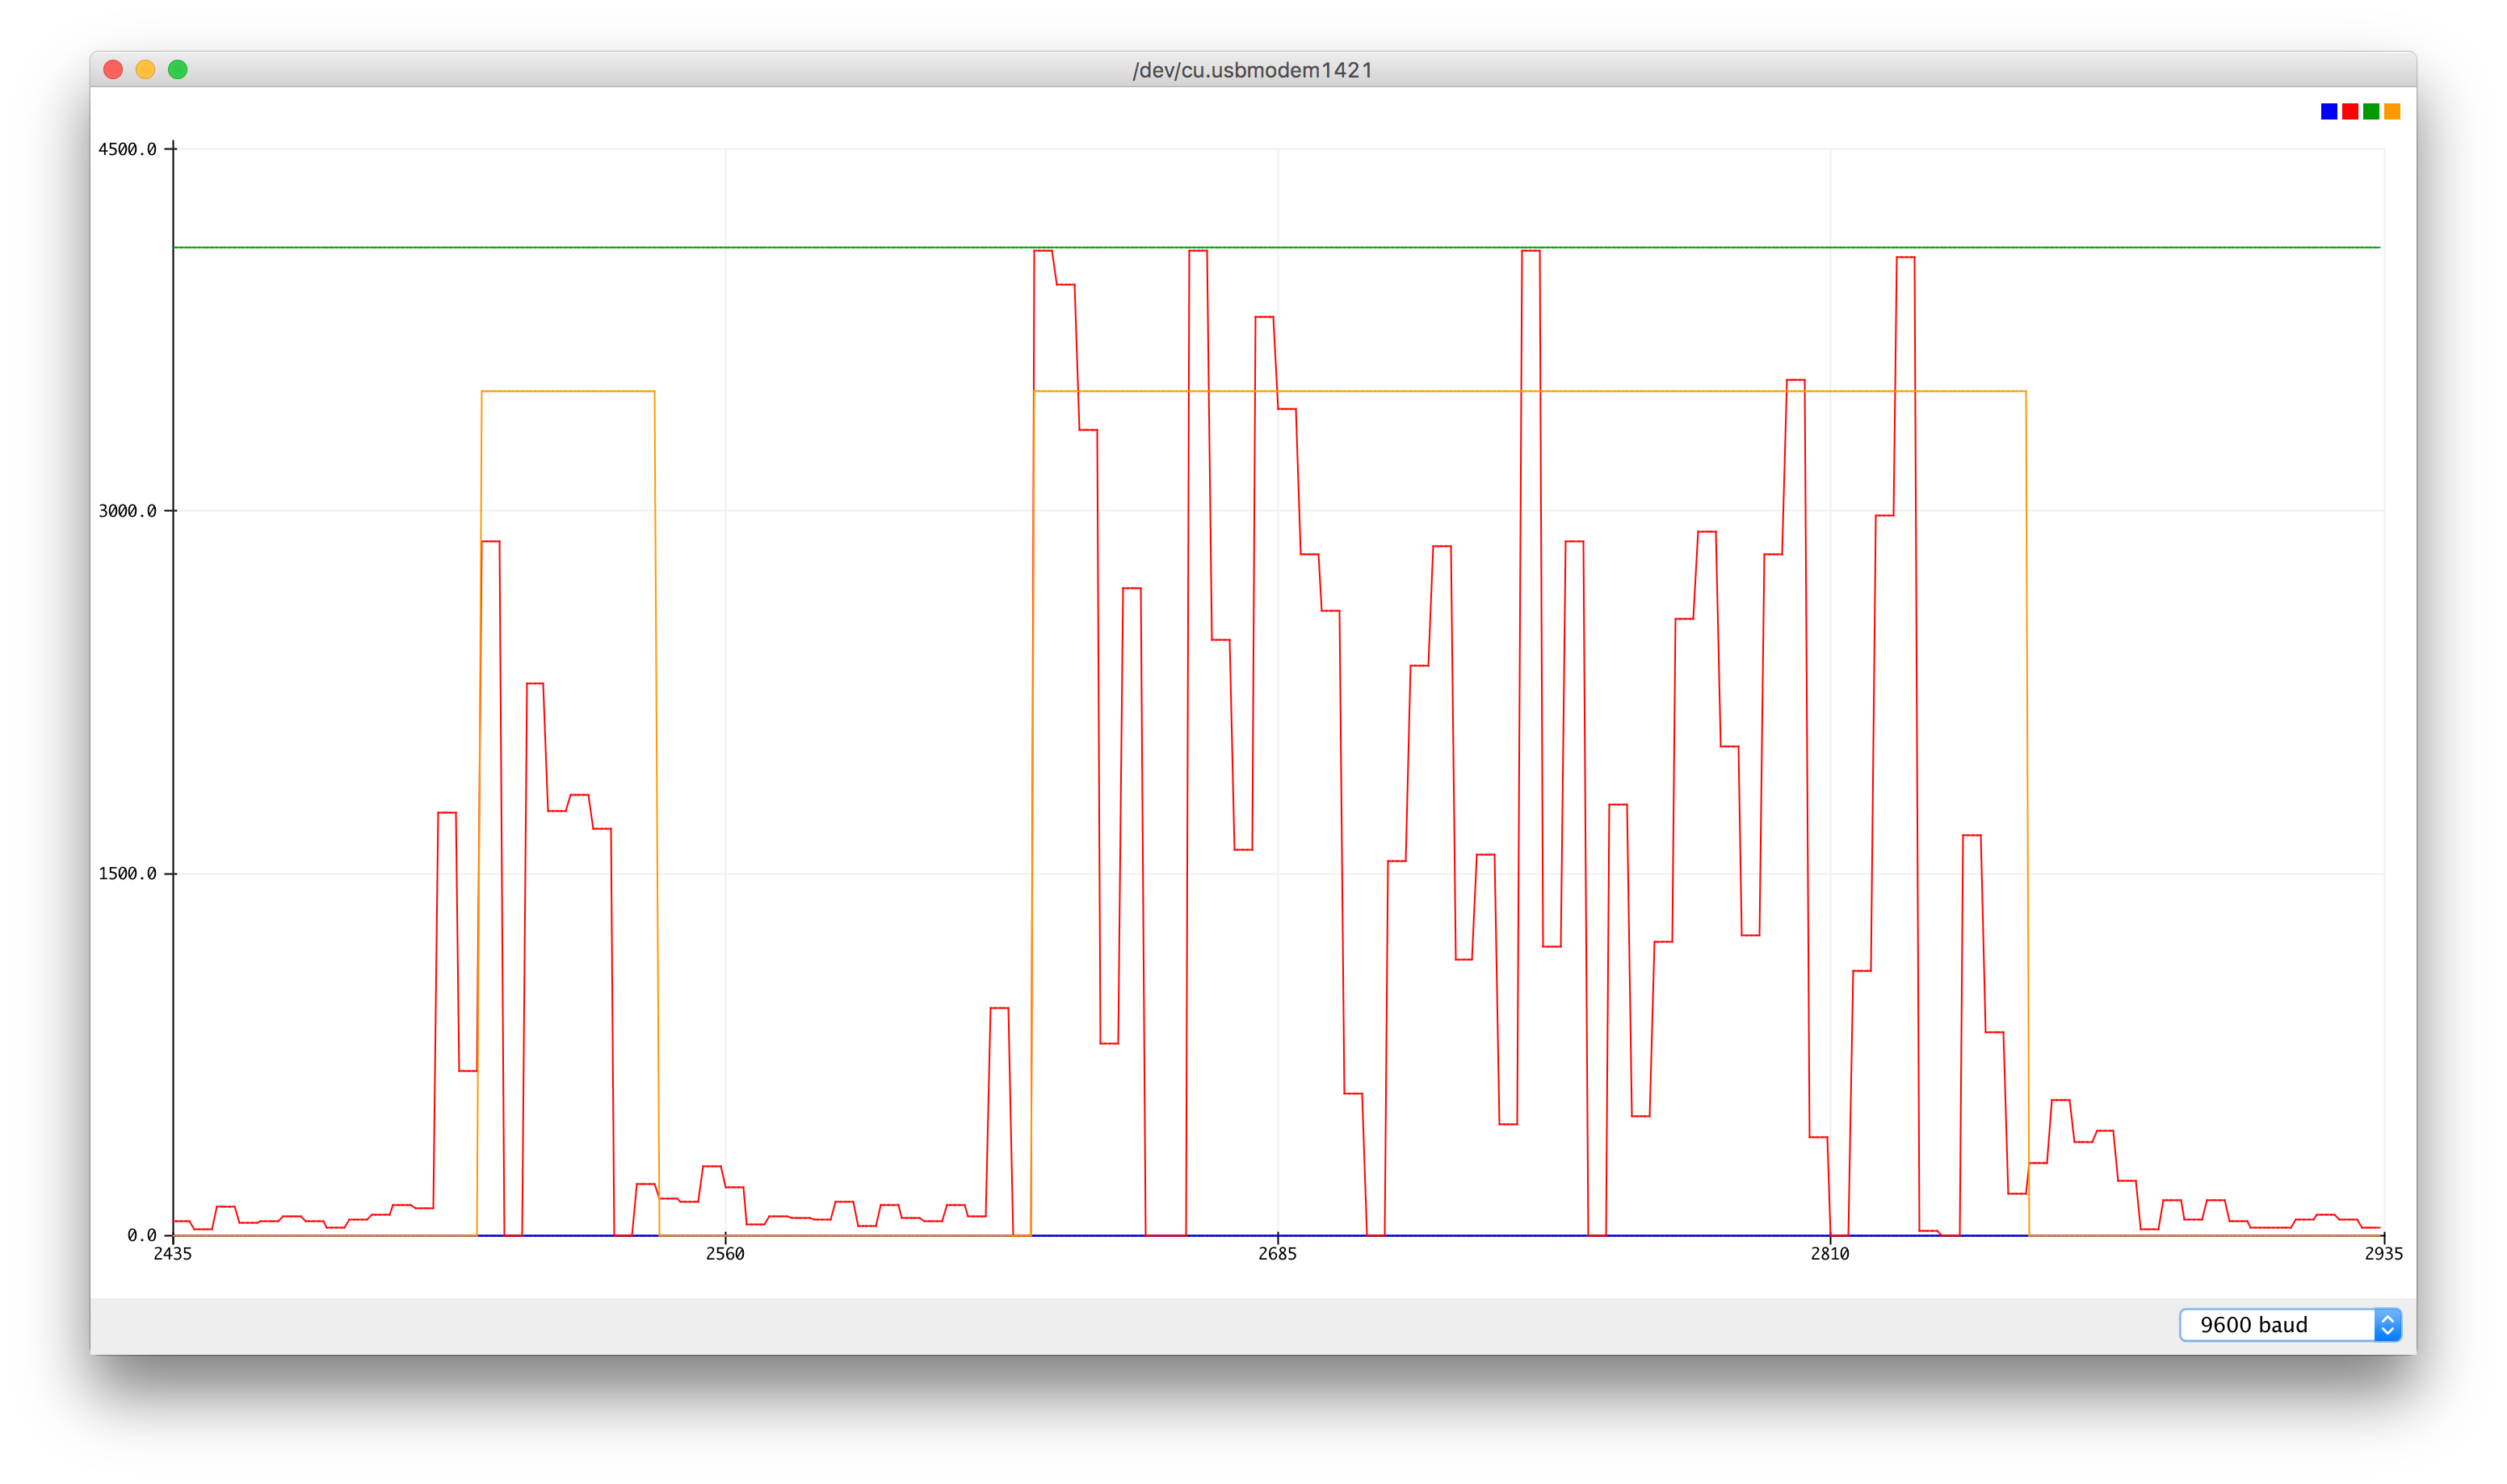
At rest the sensor outputs a value around 3100.

Quick Motion - wave hand in front of sensor

quick-motionMotion causes the value to spike low and high at mostly unpredictable rates, and over the course of multiple seconds (milliseconds would have been nice, but this is certainly workable)

Sustained Motion - dance in front of sensor

sustained-motionSustained motion triggers similar spikes, but with varying amplitudes as time passes


It's easy enough to detect single motion events. When the amplitude of the graph hits a certain threshold in a given timeframe, you have motion. Sustained motion sensing behaves a bit differently however. The amplitude of the wave has it's extremes, but will spend multiple seconds outputting more mild oscillations. Thus, the overall tactic becomes:

  1. Determine initial motion based on the detection of a large oscillation.
  2. Determine sustained motion based on the continued detection of a smaller oscillations.

Let's take a look at one more graph to bring this home. The jagged red line here is the difference between local maximums and minimums recorded at 250ms intervals, and the orange line is the final boolean value answering the question "is something moving in front of the sensor" (25 seconds in total covered here):

diffs

There's a single motion near the beginning, and sustained motion for the latter half. Even though there are multiple instances where there is very little activity recorded during the sustained motion, our threshold is set loosely enough that continued motion is still detected until it concretely comes to a stop.

The Code

I'll spare you the minute details, if you're interested in taking a look at the actual code, this gist has everything you need.

In closing, check out these pictures of our little sensors in the wild:

Design Systems: Problems & Solutions

$
0
0

Why do you need a Design System?

In a previous article, we shared our thoughts on why Design Systems may be on the rise. Now, let’s further explore why you might need one. What are some of the common problems organizations face without a Design System, and how can one help?

Common Problems

Here are a few warning signs that might indicate you need to think about implementing a Design System:

Process bottlenecks

Through agile development methodologies, rapid release cycles have improved the ability for organizations to make timely and recurring updates. This means that individuals in organizations have had to do things more quickly than they used to. The benefits of speed often come at a cost. Usually, that cost is a compromise in quality. How will you ensure quality without introducing bottlenecks to your release cycles?

Design inconsistencies

Because your design needs have had to keep up with your development cycle, you’re left with a mess. Things as simple as having a dozen different versions of a button that could be simplified down to a few—component management. Maybe you have five different versions of a similar color or twelve different font styles when you could be using four—style management. Perhaps you’ve built a check-out flow that works differently in different places creating a nightmare for your customer support team—operational management. How will you establish and maintain consistency?

Scaling challenges

Perhaps you’ve focused on one platform when you first designed but are now scaling to multiple platforms. Maybe you started as a native application and are now working towards a web-based application or vice versa. It’s possible you didn’t think about how your designs would adapt to varying screen sizes or across platforms. How will you introduce new platforms?

How can a Design System help? What problems do they solve?

Now that you’ve explored some of the reasons you might need one, let’s look at how Design Systems can help.

Centralized knowledge base

By creating and maintaining a Design System, you’ll have a centralized reference point to account for the most up-to-date standards. This resource should be easy for anyone on the company to find, comprehend quickly, and put to use. It’s the place where you find guidelines and resources. It should be updated in harmony with your evolving needs.

Cross-platform consistency

As you expand your digital footprint across varying platforms from web to native applications or from smart watches to giant displays or from voice-activated devices to extended reality (XR), you’ll be able to better align and account for design consistency. Cross-platform consistency and brand consistency are synonymous.

Less excess

Let’s face it, the more inconsistency there is with your design, the more inconsistency there will be with your underlying code. With every different version of page elements or templates, there’s a higher likelihood of unnecessary code loading to render the design elements. This means design cruft and technical debt go hand-in-hand. By minimizing unnecessary excess, you’ll be better optimized for usability while gaining performance benefits through faster rendering of content.

Increased efficiency

The less you have to start from scratch every time you start a new design, the more efficient you will be in being able to design, build, and launch things quickly. Also worth mentioning, it will be far faster and easier to get approvals if your designs are aligned with existing standards.

Not sure where to begin?

These are just a few of the reasons you might consider implementing a Design System. In our next article, we’ll explore where to begin and why you might hire an agency (like Viget) to help with your needs.

Make Your Site Faster with Preconnect Hints

$
0
0

Requesting an external resource on a website or application incurs several round-trips before the browser can actually start to download the resource. These round-trips include the DNS lookup, TCP handshake, and TLS negotiation (if SSL is being used).

Depending on the page and the network conditions, these round-trips can add hundreds of milliseconds of latency, or more. If you are requesting resources from several different hosts, this can add up fast, and you could be looking at a page that feels more sluggish than it needs to be, especially on slower cellular connections, flaky wifi, or congested networks.

One of the the easiest ways to speed up your website or application is to simply add preconnect hints for any hosts that you will be requesting assets from. These hints essentially tell the browser what origins will be used for resources, so that it can then prep things by establishing all the necessary connections for those resources.

Below are a few scenarios where adding preconnect hints can make things faster!

Faster Display of Google Fonts

Google Fonts are great. The service is reliable and generally fast due to Google's global CDN. However, because @font-face rules must first be discovered in CSS files before making web font requests, there often can be a noticeable visual delay during page render. We can greatly reduce this delay by adding the preconnect hint below!

<link rel="preconnect" href="https://fonts.gstatic.com" crossorigin>

Once we do that, it’s easy to spot the difference in the waterfall charts below. Adding preconnect removes three round-trips from the critical rendering path and cuts more than a half second of latency.

This particular use case for preconnect has the most visible benefit, since it helps to reduce render blocking and improves time to paint.

Note that the font-face specification requires that fonts are loaded in "anonymous mode", which is why the crossorigin attribute is necessary on the preconnect hint.

Faster Video Display

If you have a video within the viewport on page load, or if you are lazy-loading videos further down on a page, then we can use preconnect to make the player assets load and thumbnail images display a little more quickly. For YouTube videos, use the following preconnect hints:

<link rel="preconnect" href="https://www.youtube.com"><link rel="preconnect" href="https://i.ytimg.com"><link rel="preconnect" href="https://i9.ytimg.com"><link rel="preconnect" href="https://s.ytimg.com">

Roboto is currently used as the font in the YouTube player, so you’ll also want to preconnect to the Google fonts host if you aren’t already.

<link rel="preconnect" href="https://fonts.gstatic.com" crossorigin>

The same idea can also be applied to other video services, like Vimeo, where only two hosts are used: vimeo.com and vimeocdn.com.

Preconnect for Performance

These are just a few examples of how preconnect can be used. As you can see, it’s a very simple improvement you can make which eliminates costly round-trips from request paths. You can also implement them via HTTP Link headers or invoke them via JavaScript. Browser support good and getting better (supported in Chrome and Firefox, coming soon to Safari and Edge). Be sure to use it wisely though. Only preconnect to hosts which you are certain that assets will be requested from. Also, keep in mind that these are merely optimization “hints” for the browser, and as such, might not be acted on each each and every time. If you’ve used preconnect for other use cases and have seen performance gains, let me know in the comments below!

How Do You Todo? A Microcosm / Redux Comparison

$
0
0

For those who don't know, we've been working on our own React framework here at Viget called Microcosm. Development on Microcosm started before Redux had hit the scene and while the two share a number of similarities, there are a few key differences we'll be highlighting in this post.

I've taken the Todo app example from Redux's docs (complete app forked here), and implemented my own Todo app in Microcosm. We'll run through these codebases side by side comparing how the two frameworks help you with different developer tasks. Enough chatter, let's get to it!

Entry point

So you've yarnpm installed the dependency, now what?

Javascript
// Redux

// index.js
import React from 'react'
import { render } from 'react-dom'
import { Provider } from 'react-redux'
import { createStore } from 'redux'
import todoApp from './reducers/index'
import App from './components/App'

let store = createStore(todoApp)

render(
  <Provider store={store}><App /></Provider>,
  document.getElementById('root')
)
Javascript
// Microcosm

// repo.js
import Microcosm from 'microcosm'
import Todos from './domains/todos'
import Filter from './domains/filter'

export default class Repo extends Microcosm {
  setup () {
    this.addDomain('todos', Todos)
    this.addDomain('currentFilter', Filter)
  }
}

// index.js
import { render } from 'react-dom'
import React from 'react'
import Repo from './repo'
import App from './presenters/app'

const repo = new Repo()

render(
  <App repo={repo} />,
  document.getElementById('root')
)

Pretty similar looking code here. In both cases, we're mounting our App component to the root element and setting up our state management piece. Redux has you creating a Store, and passing that into a wrapping Provider component. With Microcosm you instantiate a Repo instance and set up the necessary Domains. Since Microcosm Presenters (from which App extends) take care of the same underlying "magic" access to the store/repo, there's no need for a higher-order component.

State Management

This is where things start to diverge. Where Redux has a concept of Reducers, Microcosm has Domains (and Effects, but we won't go into those here). Here's some code:

Javascript
// Redux

// reducers/index.js
import { combineReducers } from 'redux'
import todos from './todos'
import visibilityFilter from './visibilityFilter'

const todoApp = combineReducers({
  todos,
  visibilityFilter
})

export default todoApp

// reducers/todos.js
const todo = (state = {}, action) => {
  switch (action.type) {
    case 'ADD_TODO':
      return {
        id: action.id,
        text: action.text,
        completed: false
      }
    case 'TOGGLE_TODO':
      if (state.id !== action.id) {
        return state
      }

      return Object.assign({}, state, {
        completed: !state.completed
      })

    default:
      return state
  }
}

const todos = (state = [], action) => {
  switch (action.type) {
    case 'ADD_TODO':
      return [
        ...state,
        todo(undefined, action)
      ]
    case 'TOGGLE_TODO':
      return state.map(t =>
        todo(t, action)
      )
    default:
      return state
  }
}

export default todos

// reducers/visibilityFilter.js
const visibilityFilter = (state = 'SHOW_ALL', action) => {
  switch (action.type) {
    case 'SET_VISIBILITY_FILTER':
      return action.filter
    default:
      return state
  }
}

export default visibilityFilter
Javascript
// Microcosm

// domains/todos.js
import { addTodo, toggleTodo } from '../actions'

class Todos {
  getInitialState () {
    return []
  }

  addTodo (state, todo) {
    return state.concat(todo)
  }

  toggleTodo (state, id) {
    return state.map(todo => {
      if (todo.id === id) {
        return {...todo, completed: !todo.completed}
      } else {
        return todo
      }
    })
  }

  register () {
    return {
      [addTodo] : this.addTodo,
      [toggleTodo] : this.toggleTodo
    }
  }
}

export default Todos

// domains/filter.js
import { setFilter } from '../actions'

class Filter {
  getInitialState () {
    return "All"
  }

  setFilter (_state, newFilter) {
    return newFilter
  }

  register () {
    return {
      [setFilter] : this.setFilter
    }
  }
}

export default Filter

There are some high level similarities here: we're setting up handlers to deal with the result of actions and updating the application state accordingly. But the implementation differs significantly.

In Redux, a Reducer is a function which takes in the current state and an action, and returns the new state. We're keeping track of a list of todos and the visibilityFilter here, so we use Redux's combineReducers to keep track of both.

In Microcosm, a Domain is a class built to manage a section of state, and handle actions individually. For each action, you specify a handler function which takes in the previous state, as well as the returned value of the action, and returns the new state.

In our Microcosm setup, we called addDomain('todos', Todos) and addDomain('currentFilter', Filter). This hooks up our two domains to the todos and currentFilter keys of our application's state object, and each domain becomes responsible for managing their own isolated section of state.

A major difference here is the way that actions are handled on a lower level, and that's because actions themselves are fundamentally different in the two frameworks (more on that later).

Todo List

Enough with the behind-the-scenes stuff though, let's take a look at how the two frameworks enable you to pull data out of state, display it, and trigger actions. You know - the things you need to do on every React app ever.

Javascript
// Redux

// containers/VisibleTodoList.js
import { connect } from 'react-redux'
import { toggleTodo } from '../actions'
import TodoList from '../components/TodoList'

const getVisibleTodos = (todos, filter) => {
  switch (filter) {
    case 'SHOW_ALL':
      return todos
    case 'SHOW_COMPLETED':
      return todos.filter(t => t.completed)
    case 'SHOW_ACTIVE':
      return todos.filter(t => !t.completed)
    default:
      return todos
  }
}

const mapStateToProps = (state) => {
  return {
    todos: getVisibleTodos(state.todos, state.visibilityFilter)
  }
}

const mapDispatchToProps = (dispatch) => {
  return {
    onTodoClick: (id) => {
      dispatch(toggleTodo(id))
    }
  }
}

const VisibleTodoList = connect(
  mapStateToProps,
  mapDispatchToProps
)(TodoList)

export default VisibleTodoList

// components/TodoList.js
import React from 'react'

const TodoList = ({ todos, onTodoClick }) => (<ul>
    {todos.map(todo =><li
        key     = {todo.id}
        onClick = {() => onTodoClick(todo.id)}
        style   = {{
          textDecoration: todo.completed ? 'line-through' : 'none'
        }}>
        {todo.text}</li>
    )}</ul>
)

export default TodoList
Javascript
// Microcosm

// presenters/todoList.js
import React from 'react'
import Presenter from 'microcosm/addons/presenter'
import { toggleTodo } from '../actions'

class VisibleTodoList extends Presenter {
  getModel () {
    return {
      todos: (state) => {
        switch (state.currentFilter) {
          case 'All':
            return state.todos
          case 'Active':
            return state.todos.filter(t => !t.completed)
          case 'Completed':
            return state.todos.filter(t => t.completed)
          default:
            return state.todos
        }
      }
    }
  }

  handleToggle (id) {
    this.repo.push(toggleTodo, id)
  }

  render () {
    let { todos } = this.model

    return (
      <ul>
        {todos.map(todo =><li
            key={todo.id}
            onClick={() => this.handleToggle(todo.id)}
            style={{
              textDecoration: todo.completed ? 'line-through' : 'none'
            }}>
            {todo.text}</li>
        )}</ul>
    )
  }
}

export default VisibleTodoList

So with Redux the setup detailed here is, shall we say ... mysterious? Define yourself some mapStateToProps and mapDispatchToProps functions, pass those into connect, which gives you a function, which you finally pass your view component to. Slightly confusing at first glance and strange that your props become a melting pot of state and actions. But, once you become familiar with this it's not a big deal - set up the boiler plate code once, and then add the meat of your application in between the lines.

Looking at Microcosm however, we see the power of a Microcosm Presenter. A Presenter lets you grab what you need out of state when you define getModel, and also maintains a reference to the parent Repo so you can dispatch actions in a more readable fashion. Presenters can be used to help with simple scenarios like we see here, or you can make use of their powerful forking functionality to build an "app within an app" (David Eisinger wrote a fantastic post on that), but that's not what we're here to discuss, so let's move on!

Add Todo

Let's look at what handling form input looks like in the two frameworks.

Javascript
// Redux

// containers/AddTodo.js
import React from 'react'
import { connect } from 'react-redux'
import { addTodo } from '../actions'

let AddTodo = ({ dispatch }) => {
  let input

  return (
    <div><form
        onSubmit={e => {
          dispatch(addTodo(input.value))
        }}><input ref={node => {input = node}} /><button type="submit">Add Todo</button></form></div>
  )
}
AddTodo = connect()(AddTodo)

export default AddTodo
Javascript
// Microcosm

// views/addTodo.js
import React from 'react'
import ActionForm from 'microcosm/addons/action-form'
import { addTodo } from '../actions'

let AddTodo = () => {
  return (<div><ActionForm action={addTodo}><input name="text" /><button>Add Todo</button></ActionForm></div>
  )
}

export default AddTodo

With Redux, we again make use of connect, but this time without any of the dispatch/state/prop mapping (just when you thought you understood how connect worked). That passes in dispatch as an available prop to our functional component which we can then use to send actions out.

Microcosm has a bit a syntactic sugar for us here with the ActionForm addon. ActionForm will serialize the form data and pass it along to the action you specify (addTodo in this instance). Along these lines, Microcosm provides an ActionButton addon for easy button-to-action functionality, as well as withSend which operates similarly to Redux's connect/dispatch combination if you like to keep things more low-level.

In the interest of time, I'm going to skip over the Filter Link implementations, the comparison is similar to what we've already covered.

Actions

The way that Microcosm handles Actions is a major reason that it stands out in the pool of state management frameworks. Let's look at some code, and then I'll touch on some high level points.

Javascript
// Redux

// actions/index.js
let nextTodoId = 0

export const addTodo = text => {
  return {
    type: 'ADD_TODO',
    id: nextTodoId++,
    text
  }
}

export const setVisibilityFilter = filter => {
  return {
    type: 'SET_VISIBILITY_FILTER',
    filter
  }
}

export const toggleTodo = id => {
  return {
    type: 'TOGGLE_TODO',
    id
  }
}
Javascript
// Microcosm

// actions/index.js
let nextTodoId = 0

export function addTodo(data) {
  return {
    id: nextTodoId++,
    completed: false,
    text: data.text
  }
}

export function setFilter(newFilter) {
  return newFilter
}

export function toggleTodo(id) {
  return id
}

At first glance, things look pretty similar here. In fact, the only major difference in defining actions here is the use of action types in Redux. In Microcosm, domains register to the actions themselves instead of a type constant, removing the need for that set of boilerplate code.

The important thing to know about Microcosm actions however is how powerful they are. In a nutshell, actions are first-class citizens that get things done, and have a predictable lifecycle that you can make use of. The simple actions here return JS primitives (similar to our Redux implementation), but you can write these action creators to return functions, promises, or generators (observables supported in the next release).

Let's say you return a promise that makes an API request. Microcosm will instantiate the action with an open status, and when the promise comes back, the action's status will update automatically to represent the new situation (either update, done, or error). Any Domains (guardians of the state) that care about that action can react to the individual lifecycle steps, and easily update the state depending on the current action status.

Action History

The last thing I'll quickly cover is a feature that is unique to Microcosm. All Microcosm apps have a History, which maintains a chronological list of dispatched actions, and knows how to reconcile action updates in the order that they were pushed. So if a handful of actions are pushed, it doesn't matter in what order they succeed (or error out). Whenever an Action changes its status, History alerts the Domains about the Action, and then moves down the chronological line alerting the Domains of any subsequent Actions as well. The result is that your application state will always be accurate based on the order in which actions were dispatched.

This topic deserves its own blog post to be honest, it's such a powerful feature that takes care of so many problems for you, but is a bit tough to cram into one paragraph. If you'd like to learn more, or are confused by my veritably confusing description, check out the History Reconciling docs.

Closing Thoughts

Redux is a phenomenal library, and the immense community that's grown with it over the last few years has brought forth every middleware you can think of in order to get the job done. And while that community has grown, we've been plugging away on Microcosm internally, morphing it to suit our ever growing needs, making it as performant and easy to use as possible because it makes our jobs easier. We love working with it, and we'd love to share the ride with anyone who's curious.

Should you be compelled to give Microcosm a go, here are a few resources to get you running:

Design Systems: Where to Begin

$
0
0

In our last article, we explored reasons you might need a Design System and how they can help. If you’re interested in the promises a Design System can offer, you might be wondering if you need help and where to start. This article is written with that in mind.

Why hire an agency? Why not DIY?

It’s true that many large companies are beginning to address the need for Design Systems from within their organization. So, why work with an agency when you can start working on this yourself? Here are a few important reasons:

Scale

We can scale according to your needs—either by doing everything for you or by supplementing your in-house team. An agency has, by design, a diversity of roles—everything from UX, design, copywriting, and development. We have specialists who can consult on your work who you wouldn’t otherwise hire. Maybe you have developers but zero to few designers. Maybe your designers are already at capacity on internal projects or focused on other matters.

Timing

Hiring and ramping up a solid team is a lengthy process. An agency has a team that can begin immediately. We regularly adjust our long-term planning to account for schedule fluidity and can usually assemble a team quickly for pressing needs. If you need additional resources, it’s far more likely for us to have availability by someone winding down a project than for you to go through another long hiring cycle to find exceptional talent.

Quality

Before you commit to hiring more people it’s a good idea to work with people who know what they are doing. We have a system of accountability to ensure that the work we do is technically correct, extensible, and of a high caliber. We have high standards when it comes to recruiting and only hire the best.  

Expertise

Maybe an agency has a reputation of being leaders or innovators in an emerging area for you. Within each area of expertise, we take time for professional development within our groups and as individuals. We believe in lifelong learning and continual growth. As an agency, we’re exposed to a variety of industries and companies that are at varying stages of growth. We pay attention to emerging technologies and invest time into learning more about the ones we believe in.

Advice

We can offer advice on how best to organize your assets and what to look for if you’re thinking of bringing expertise in-house more gradually. An agency may be better positioned to look at products and services across a large organization, whereas internal teams may be too focused on a single product or service to see the larger picture.

How do we get started?

Maybe you’re thinking you need a Design System but don’t really know where to start. As we see it, there are three primary entry points—evolving your existing system, revolutionizing with a redesign, or starting from scratch.

Evolution

If you’re a large organization that’s been operating in digital for years, there’s a good chance that you simply need to reverse engineer what you have into a better organized system. In this case, we typically start with an audit of your system to see what you have and look for patterns and inconsistencies. From here, we would take things into a fairly typical research, design, build, launch, analyze, and repeat lifecycle. In a case like this where we’re starting with what you already have, we’d recommend working in agile sprints that could coincide with your existing release cycles.

Revolution

Sometimes we’re faced with an opportunity to take what you have and completely revamp it—often referred to as a redesign. This is often the biggest lift because it involves research to better understand what got you to where you are and where you’d like to go from here. Sometimes it’s as simple as a reskin—a focus on improving the look and feel without thinking more strategically about the possibilities. Preferably, we’re also helping you with your objectives to better help you tie everything back to your vision and mission, positioning, and messaging with great thought, care, and detail put into your look and feel as well as your voice and tone. In this case, we recommend a more strategic approach which would likely involve staggered sprints based on milestones catered to your needs.

Creation

If you’re a smaller organization just starting out, we’d likely go through a slightly different process. We wouldn’t necessarily need an audit of your existing system, but we’d still want to do proper research to get to know you and your competitive advantages better. It’s likely in this scenario that we’d spend more exploratory time up front to figure out what would work best for you. For this, we’d recommend more of a milestone approach to the design to better cater to you seeing things for the first time.

Extension

There's one more area to consider where it might make sense to get help. It's possible you already have a good Design System in place. Where you could be facing challenges is in extending that system further. Maybe you don't have capacity or the right people right now to take what you have and apply it further at the speed you would like. In a case like this, it would be natural for an agency to help you. While we may not be educated about your system out of the gate, we've worked with other companies and their systems and can be quick studies to understand what you have and how to scale in accordance with the system. We can also advise on how to leverage the system to tackle new problems that emerge. 

What goes into a Design System?

These are just some examples of how an agency, like Viget, will evaluate your needs to know how best to help and where to begin. In our next article, we’ll share more about what goes into a Design System to give you a better picture of what a typical makeup looks like are and what is best for you.

Design Systems: Design-Development Collaboration

$
0
0

In our series on design systems, we’ve discussed the advantages and approaches to creating a system from a design perspective. In this post, I’d like to cover some of the new tools that developers and designers are using.

There’s been a lot of exciting activity around design tools in the last few years, and it’s changing how designers and developers collaborate. For those uninitiated front-end developers (if you’ve entered the industry in the past few years), building out a design used to mean wading into a designer’s world: Photoshop. Even after years of doing buildouts from Photoshop, I found the interface to be largely unintelligible. If the organization system of the designer is not on point you could be in for an even bumpier ride. Developers want to quickly get accurate build information and not worry about layer names, how to turn off a mask to get at an image, or if that turned-off layer is important.

At Viget, we’re constantly evaluating the tools to ensure that they improve our workflow rather than bog it down. In the past year, we’ve been putting the two main design-development collaboration tools, Figma and Zeplin, through their paces. The goals of these two apps are very different: Figma is a design tool with features that reveal buildout information, while Zeplin was built purely to facilitate design handoff. Zeplin still leads the pack in delivering buildout information, but Figma has become our one-tool-to-rule-them-all, particularly because their developer tools are catching up.

Benefits of a New Workflow

While some aspects of buildout are true for any project, there are a few particularly important aspects when building a design system, and the right tool or workflow can make all the difference in:

  • Quickly surfacing accurate information about a thing (ex. size, color, position, font).
  • Checking for consistency in the design across pages to help keep the parts kit small and maintainable.
  • Seeing modular design patterns and components that can be used as building blocks.

These new apps have made it easier to intuit and build a design system by:

Providing Ways to See More at Once

Our designers started the practice of putting every page layout in one artboard in Photoshop, but it didn’t take much for the app to get bogged down and slow. This isn’t the case with Figma, and that’s created benefits all around. For a developer, getting to see the entirety of a design system in one view is a great way to quickly move around multiple parts of a system and pick up on similarities and patterns.

Giving Quick Access to Information and Keeping Developers Out of Design Tools

When buildout information, like a font size, can be buried in nested layers, layer comps, or locked up in a mask, it can be time-consuming to navigate the advanced functionality of something as complex as Photoshop. Zeplin and Figma have both made this process light years easier by exposing developer-ready information with a single click.

Converting Design to Code

Even better than getting style information with a click is getting the code. Both Zeplin and Figma output copy-and-paste code snippets for an ultra-fast and accurate workflow. Bonus points go to Zeplin for providing a choice of CSS, Sass, SCSS, Less, and Stylus formats and allowing the developer to customize color variable names.

Measuring Everything

Getting measurements right, both of a thing and between things can be time-consuming. In addition to getting things like font information, Zeplin and Figma provide dimensions and distances for every object, making accurate buildouts a breeze.

Facilitating Communication

In the past, questions about a design had to take place separate from the design in email or a chat app like Slack. The best workflow I ever devised was to annotate a screenshot of the design with arrows and comments and send it to the designer for feedback — very inefficient! With Zeplin and Figma’s built-in commenting system, designers and developers can talk within the context of the design in nearly real time.

Wrap Up

We’re excited to see how these tools evolve as they continue to improve the quality and speed of our workflow. At the time of this writing, along with Zeplin and Figma, there are many other promising tools like Sympli, Sketch Measure, InVision Inspect, and Avocode. These new entrants should create some great competition.

Do you have experience with one of these tools or comments about the article? Don’t be shy about jumping into the comments!

Two Hardware Lessons from the Front Line: PID Loops and Bootloading

$
0
0

About a year ago, we began collaborating with Pura Scents to make their connected fragrance dispenser a reality. Their team had ironed out a concept that people loved, and during a successful Kickstarter campaign, paired it with an aesthetic that sold well. However, they needed next some outside help to bring their connected device to life.

Among the firmware, software, and fleet management aspects were two specific product features with technical intrigue that struck me as worth sharing, firmware/hardware-level features that anyone working within a hardware startup can appreciate. 

Control systems for targeting and maintaining temperature (or speed, or anything)

Imagine driving a car with cruise control. How annoying would it be if your car accelerates a bit beyond the target cruise speed then coasts for a moment or two before physics rears its ugly head and your car drops below the desired speed again? This, of course, necessitates another bump in acceleration and thus the cycle repeats. Accelerate, coast, accelerate, coast. That would be annoying and also terribly inefficient.

A better solution is to maintain effort. This, more or less, is what you’ll find written among the first few pages of a process engineers playbook for this situation: proportional–integral–derivative (PID) control.

Instead of turning a heater on whenever the temperature for a fragrance dipped below its optimal burn temperature, we integrated and tuned a PID loop to gradually do that for us. What that actually looks like in practice is a bit of math to determine exactly how much effort to ask from the heater in order to get the temperature back to where it needs to be. However, this approach has one huge negative: it costs more. How?

For PID loops to work, they need to have a reliable feedback mechanism. For heaters, that might look like a custom ceramic heating element that incorporates a thermistor with a wiring harness or pigtail terminating with a JST or similar tag connector. These components add to the bill of materials (BOM) and increases assembly and QA cost. But is the extra cost necessary?

For Pura, we could just as easily map a heater’s level of effort with a temperature to target and maintain an ideal temperature for each fragrance. This meant we wouldn’t need to include any feedback mechanisms in the device. Pura explored the benefits of both approaches (to PID or not to PID) and ultimately decided the performance gain wasn’t there… it didn’t contribute to a fundamentally better product and would cost consumers more.

Lesson: PID loops can be designed and tuned to adjust systems from one state to another. However, their benefits may come at a cost, and those benefits may be easily replicated through some wit.

Bootloading for liquid level sensors

Product engineers are incorporating self-capacitance buttons into an increasing number of products. From my perspective, the uptick is justified because they solve two major problems: 1)They are affordable and 2) do very well in water or dust ingress-prone environments. They  are also relatively straightforward circuits with detection areas that can be etched onto PCBs (and optionally controlled with dedicated SOCs that abstract many software-level complexities). Perhaps best of all is their flexibility. Capsense sensors can do far more than just detect the presence of a finger. They can also detect the presence of liquid.

Pura wanted a way to approximate the amount of liquid remaining in either of their two fragrance vials at any time. Like your finger, fragrance oil also has a capacitance. This creates a straightforward path to design a circuit providing some granular amount of liquid-level detail. So, instead of worrying about how the product might change over time, or in what extremes it would need to operate, Pura focused on designing firmware that was both flexible and completely upgradable.

Because the Pura device was connected to the internet, we had the ability to write firmware that was remotely upgradable. For consumers, this enables Pura to continually improve their existing products over time. However, the peripheral chips do not directly have connectivity, but may likely require an upgrade in the future. While it would have been cheap and easy to ship devices with “one and done” capsense sensors that were forever locked into their firmware ways, Pura decided to invest early in a bootloader that enabled their capsense chips to be forever upgradable. And, this investment has already paid dividends. During an initial beta period users helping to improve the device were provided with remote capsense updates to improve fragrance level-readings which, in turned, informed changes to the mobile app.

Lesson: Peripheral devices need bootloaders too. Save yourself from future regret and invest early in compatibility. Never expect a first solution to be the best solution a year from now.


Set Up AWS CLI and Download Your S3 Files From the Command Line

$
0
0

The other day I needed to download the contents of a large S3 folder. That is a tedious task in the browser: log into the AWS console, find the right bucket, find the right folder, open the first file, click download, maybe click download a few more times until something happens, go back, open the next file, over and over. Happily, Amazon provides AWS CLI, a command line tool for interacting with AWS. With AWS CLI, that entire process took less than three seconds:

$ aws s3 sync s3://<bucket>/<path> </local/path>

Getting set up with AWS CLI is simple, but the documentation is a little scattered. Here are the steps, all in one spot:

1. Install the AWS CLI

You can install AWS CLI for any major operating system:

2. Get your access keys

Documentation for the following steps is here.

  1. Log into the IAM Console.
  2. Go to Users.AWS web interface for viewing all users
  3. Click on your user name (the name not the checkbox).AWS web interface for managing a user
  4. Go to the Security credentials tab.AWS web interface for viewing user security credentials
  5. Click Create access key. Don't close that window yet!AWS web interface for creating a new access key
  6. You'll see your Access key ID. Click "Show" to see your Secret access key.AWS web interface for revealing your secret key
  7. Download the key pair for safe keeping, add the keys to your password app of choice, or do whatever you do to keep secrets safe. Remember this is the last time Amazon will show this secret access key.

3. Configure AWS CLI

Run aws configure and answer the prompts.

Each prompt lists the current value in brackets. On the first run of aws configure you will just see [None]. In the future you can change any of these values by running aws cli again. The prompts will look like AWS Access Key ID [****************ABCD], and you will be able to keep the configured value by hitting return.

$ aws configure
AWS Access Key ID [None]: <enter the access key you just created>
AWS Secret Access Key [None]: <enter the secret access key you just created>
Default region name [None]: <enter region - valid options are listed below >
Default output format [None]: <format - valid options are listed below >
  • Valid region names (documented here) are

    RegionName
    ap-northeast-1Asia Pacific (Tokyo)
    ap-northeast-2Asia Pacific (Seoul)
    ap-south-1Asia Pacific (Mumbai)
    ap-southeast-1Asia Pacific (Singapore)
    ap-southeast-2Asia Pacific (Sydney)
    ca-central-1Canada (Central)
    eu-central-1EU Central (Frankfurt)
    eu-west-1EU West (Ireland)
    eu-west-2EU West (London)
    sa-east-1South America (Sao Paulo)
    us-east-1US East (Virginia)
    us-east-2US East (Ohio)
    us-west-1US West (N. California)
    us-west-2US West (Oregon)

  • Valid output formats (documented here) are
    • json
    • table
    • text

4. Use AWS CLI!

In the example above, the s3 command's sync command "recursively copies new and updated files from the source directory to the destination. Only creates folders in the destination if they contain one or more files" (from s3 sync's documentation). I'm able to download an entire collection of images with a simple

aws s3 sync s3://s3.aws-cli.demo/photos/office ~/Pictures/work

But AWS CLI can do much more. Check out the comprehensive documentation at AWS CLI Command Reference.

Design Systems: The Parts

$
0
0

In our last article, we explored why you might seek help getting started on your Design System and where to begin. Now, we’ll explore what goes into one.

What goes into a Design System?

There are some differing opinions on exactly what goes into a Design System and how best to structure the inventory. From what I’ve seen, the differences from one system to another are mostly about nomenclature and how best to organize things. For us, we’ve largely defined Design Systems as "a digital library of guidelines and resources." 

Guidelines

Simply put, these are the documented standards—a place to go to see examples and written descriptions to better understand usages patterns. We break them up into two primary categories: Style Guidelines and UI Guidelines.

Style Guidelines

These are the perceptual patterns that are core to the brand, from principles to voice and tone guidance.

Examples:

  • Principles
  • Colors
  • Typography
  • Voice & Tone
  • Logos & Identity
  • Accessibility
  • Motion
  • Sound

UI Guidelines

These are the building blocks of your user interface (UI) design—the functional patterns. It’s worth noting you may see other organizations call this a Component Library or Pattern Library—we like UI Guide as a nice complement to a Style Guide.

Here’s a list of things you might find in a UI Guide. Note this list only includes some of the more common components for brevity—to see what a long list looks like view Salesforce’s Lightning Design System.

Examples:

  • Alerts
  • Avatars
  • Badges
  • Blockquotes
  • Breadcrumbs
  • Buttons
  • Captions
  • Cards
  • Carousels
  • Checkboxes
  • Data Tables
  • Dividers
  • Drawers
  • Grid
  • Headings
  • Iconography
  • Lists
  • Pagination
  • Paragraphs
  • Progress Indicators
  • Radio Buttons
  • Select Boxes
  • Spacing
  • Tabs
  • Tags
  • Text Fields
  • Toggles
  • Tool Tips

Resources

This is where you go for usable parts, whether it be source files or code samples. In our organization, we often refer to these as a “Parts Kits” and separate them into two categories: one by designers and one by developers. Audiences vary based on needs, but the use case is usually a means of helping to build, extend, and maintain your Design System across an ecosystem of touch points.

Design Toolkit

These are the source files (usually) created by a designer and made available for download.

Examples:

  • Logos
  • Licensed Fonts
  • Color Palettes
  • Icon Libraries
  • Graphics (patterns, textures, etc.)
  • Page templates
  • Design Source files (Sketch, Photoshop, Figma, etc.)

Developer Toolkit

These are the usable parts, samples, and examples made by a developer for use and reference.

Examples:

  • Modular components
  • Code snippets
  • Page builders

In Summary

I hope this gives you a good idea of how Design Systems can be structured. Quite honestly, they come in all shapes and sizes. Even if you only have a small portion of what you see listed in this article, you’ll already have the beginning of one. After all, Design Systems are meant to expand and evolve over time so getting started can be easy.

For further exploration, here are a few examples of Design Systems that we like:

Examples:

Design Systems: Building a Parts Kit

$
0
0

In our series on design systems, we’ve discussed the advantages and approaches to creating a system from a design perspective. In this post, I’d like to cover some of the technical benefits of a well-organized built design system, or “parts kit”.

By now, you’re hopefullyconvinced of the benefits of a design system and are ready to invest the time and money to partner with an agency, like Viget, to create something that achieves your vision. The next step will be to apply it to your digital platforms by building it. But wait! If the design system represents your vision and investment, a good parts kit is like insurance that protects that vision when it goes out into the world.

The Importance of Building it Right

A well-constructed parts kit has many benefits that can ensure the consistency and longevity of a design system. The investment in development quality is equally important to the investment in design and will have a long-lasting effect on the success of the system.

Systems Are Easier to Maintain and Extend

One of the lesser-known challenges of building and launching a site is efficiently maintaining it after it’s launched. Ongoing work, big and small, can quickly bloat a codebase as developers unfamiliar with the project (or even original developers once they’ve moved on to other projects) drop in for bug fixes and new features. Without a system, these developers are forced to recreate the wheel every time, adding more and more to the codebase, making it unwieldy over time. With a well-organized system and parts kit for reference, developers can leverage past work to create new things. In some cases, new features and entire pages can be built with little or no addition to the parts kit.

Systems Lead to Better Code

Most developers, including the ones here at Viget, revel in building modular and systematized code. If you look under the hood of a site that’s made up of seemingly all unique parts and layouts, there will still be an underlying system that a developer sussed out. That’s because creating a system is at the heart of the DRY (Don’t Repeat Yourself) principle. Whether it’s a high-impact marketing site or a structured UI system for an application, building in a systematic and modular way results in well-organized and efficient code.

Systems Improve Workflow and Collaboration

In the same way that a visual design system communicates branding and consistency and provides a “source of truth” for everyone who needs to work with it, we have found that a parts kit is essential in a variety of working situations:

Post-Launch Transition to Client Team

Some of our projects result in turning over the day-to-day running of a site to an internal web team. From ongoing maintenance to adding new pages and features, building from, or extending, a parts kit is considerably faster and results in better consistency with the original system.

Framework Hand-Off

In other cases, the parts kit is itself the deliverable. For Rotary International, we worked with their highly-capable and enthusiastic internal development team to deliver a framework specific to their design and content strategy. Their team integrated our work with their content management system for a site refresh and continue to utilize it as they produce new content.

Agency-Client Collaboration or Staff Augmentation

Whenever we work closely with external designers or developers, having a shared vocabulary is an essential communication tool. In building a parts kit, accessible by everyone on both teams, we’re able to have a reference point for conversations, whether it’s about design, interactivity, or quality assurance testing (QA).

Systems Expose and Enforce Design Consistency

Let’s face it, the design and review process can be brutal on design systems. On one project, I counted over 40 shades of gray that had sprawled like a family tree over successive generations of comps and revisions. In a built-what-you-see approach, I would have incorporated every color into the codebase and lost any structure around what gray was used for what. Instead, taking a systematic approach, I collected all the shades and presented them to the designer (he was embarrassed) so he could consolidate them down to a tidy eight. In this example, building with a system in mind allowed me to critically look at small variants in the design system and normalize them into a more streamlined and maintainable codebase.

Systems Provide a Deliverable And “Source of Truth”

As is discussed in many of the above examples, a parts kit can be a lasting and valuable reference for the original work. As sites grow and age, one of the keys to maintaining a consistent look and feel across all content, new and old, is to constantly refer back to the parts kit as the “source of truth”. Using it as a guiding light, future developers and content contributors can work more quickly and efficiently while maintaining the original vision of the design system.

Wrap Up

Building a design system into a parts kit is where the rubber meets the road — a static design becomes an interactive, usable thing. At Viget, we believe that a rigorous design process should be matched with equally robust development.

Resources

Common Connected Hardware Blunders

$
0
0

Over the last few years we’ve worked with a number of startups who have engaged with Viget for help designing or engineering some aspect of their connected product. Every product is unique, but it may surprise you how similar their challenges are. What is perhaps less surprising is the number of inventive ways we’ve seen solo-entrepreneurs, young startups, and even internal business units with firm foundations go about solving those challenges. I’ll take a moment to reflect on some of those challenges and specifically call attention to the missteps and follies we commonly see early-on in engagements.

Building the wrong prototype

Viget builds primarily two different kinds of product prototypes. A stakeholder prototype, which focuses on delivering desired functionality by leveraging as many pre-existing solutions as possible. And a functional prototype, which focuses on exploring production options by honing in on core mechanics and functionality. Both prototypes serve specific needs which often correlate with the natural phases of product development. Sometimes the prototype should support buy-in for an idea, other times it should help sell the path forward.

In both situations the prototype is the center of attention. The prototype is what you share with your team, your boss, investors, and your crowd-sourced customers (even your mom!). Because of the spotlight, it needs to behave in ways that put a good foot forward. This is why we’re so surprised when we come across cobbled-together assemblies that supposedly represent a product vision. It might only work because it gets cast alongside a tremendous number of conditions and explanation. I.e: 

“...ignore this part, focus on this, let me articulate this thing by hand to show you want it WILL do...”

We admire the gumption and eagerness to make things — especially from our clients — but instead, consider the alternative: a self-evident prototype. A prototype that stands up on its own and clearly articulates a vision. A good litmus test is what you’ll find when you crack open the enclosure of a connected prototype. Is it something you are proud to share? Or is it a rat's nest of wires with indeterminable purpose? Why not invest the extra time, and the extra money, and dedicate some effort to articulating an effective product vision? Build the prototype that serves its specific purpose and can survive being the center of attention. Anything less and you are wasting time by building the wrong prototype.

Waiting for perfection

Developing connected products, like anything, is a balancing act. Wait too long and over-build a prototype and you’ll become overly invested in one direction. A tempering thought to keep in mind: every day spent on product development is a day not on the market. Future you is absolutely going to miss out on that revenue.

Finding the right balance stems from experience. Very plainly, it’s important to figure out which features are necessary for achieving present business goals. This gets complicated, fast, because those objectives change. Connected products benefit from a maturing market which will support any number of value-add services, and business want the flexibility to explore and ultimately choose the right one.

Take a look at Helium as an example. This team has iterated for well over three years on a concept where the underlying technology has morphed just as often as their business. Over time they have developed strong relationships with their community, their customers, and their investors -- demonstrating an ability to not only deliver useful products to the customers they have today, but also develop products for the customers they want tomorrow.

Restless Bill of Materials

Another source of pain I see are business decisions which needlessly accelerate product evolution. A good example is the price of a bill of materials (BOM) conflicting with business or marketing objectives.

Consider a fully-developed production-prototype built on the back of specific MCUs, peripherals, toolings, and plastics. The cost of adjusting this BOM late-stage is significant, not to mention a collective headache. However it is a common occurrence because around the time that something is ready to enter production its total in-the-box cost can be scrutinized. It is around this time a product team will receive an email along these lines:

“We’re trying to keep the device costs down to x, we hit a snag here and so we’re currently at y, anything we can we do?”

The product team will take a good look at low-hanging fruit already earmarked as extravagance.

“We’re currently platformed on x but can go to y which costs z less. But it means we’ll need to re-develop portions of the firmware, re-route this, calibrate that, etc”

Unlike software, hardware is generally less forgiving to constant tweaks and adjustments. It’s an all around better thing to simply nail to the wall correctly the first time. But that is obviously a hard mark to hit, so what options exist?

  1. Go to market regardless with the higher price point.
  2. Go to market with the lower (desired) price point. Take it out of the margin, or eat it. Make it up with scale or an equally performant but lower cost v2 in the future.
  3. Account for the long-term upside of value-add cloud services (subscription, etc).

I really like options two and three, businesses that maintain a price point and develop margins over time. This is complex to model, and more complex to convey to investors or other stakeholders. However, it keeps the right priorities in place: ship early, develop value-add services, cultivate relationships with suppliers.

Ultimately a restless BOM is indicative of teams not truly collaborating together. There are strategies to hurdle specific challenges, and even aid with hardware versioning, but if the BOM is constantly changing there is little opportunity to build valuable services on top a hardware foundation. And, based on our experience, those value-add services are what matter the most to a connected product businesses.

Hit a snag manufacturing your connected product? Tell us about it below or contact us.

Talks, Thoughts, and Texas: Viget at SxSw 2018

$
0
0

While Olympics highlights and Valentine's day memories are fresh in our minds, I'm here to ease you into the impending month of March. Not for the basketball madness, or St. Patrick's day traditions — but for the tech tradition of SXSW and next week's festivities. And in what will be our third consecutive year with multiple talks, we'll be sending our own small crew to Texas — including some fresh faces — for the knowledge, for the sharing, and for the free things they hand you while walking around. In addition to our two workshops, here are a few talks, and thoughts on SXSW 2018:

Thought:

"I think the implications of AI are growing and being discovered at, or behind the pace of, AI tech which makes it an increasingly interesting, albeit a little scary at times, technology to learn about and work with."
- Ian Brennan, Viget Developer

Talk:

Regulating AI: How to Control the Unexplainable

  • Recommended by: Ian Brennan, Viget Developer
  • When: Friday, March 9, 12:30PM - 1:30PM
  • Where:JW Marriot, Salon 6, 110 E 2nd St

The rise of AI seems unstoppable—from finance to advertising, medicine and logistics, AI is reshaping industries. But the biggest hurdle to the adoption of AI lies in how well this “black box” technology can be controlled. Indeed, the past few years have seen a rise in regulations impacting AI, and more are on their way. This talk will explain how the worlds of AI and law are colliding, and what this means for data-driven companies, the tech industry, governments and citizens around the world.

Thought:

"I'm interested in the production and capture of 3D content as we move forward — especially now with Facebook rolling out embedded 3D media in the news feed. I think the trend will be that we will see more and more 3D content added to our daily consumption."
- Prayash Thapa, Viget Developer

Talk:

Beyond AR/VR: The Dawn of Volumetric Productions

  • Recommended by: Prayash Thapa, Viget Developer
  • When: Thursday, March 15, 11:00AM - 12:00PM
  • Where:JW Marriot, Salon 1-2, 110 E 2nd St

People question whether VR & AR will be fads not realizing that the underlying tools at the heart of the new mediums is already something key to film production – volumetric capture. We will discuss the stage of volumetric capture, pipelines, workflows and how volumetric content leverages the cutting edge video capture and photogrammetry technology to create realistic assets for VFX heavy features, VR, AR, MR, and whatever comes next.

Thought:

"I always love spending time touring through the SXSW Expo. There’s always a handful of companies using the latest technology to solve new and interesting problems."
- Eli Fatsi, Viget Sr. Developer

Our Talks

For the third consecutive year we have two intensive technical workshops. Unfortunately, the first is completely booked up (we are sorry!) — but please do RSVP for our Sunday workshop! If you aren't one of the lucky registrants, we’d love to meet up for a beer or some bbq so contact us.

Exploring the Raspberry Pi Zero W

  • When: Saturday, March 10, 9:30AM - 12:30PM
  • Where:JW Marriot, Room 402-403, 110 E 2nd St

In this workshop you'll get to dig into the capabilities of the new Raspberry Pi Zero W by the best means possible: hacking on it for a few hours together! Everyone involved will set up a motion activated camera with the Raspberry Pi Zero W that texts you gifs when it senses motion. With the help of Viget developers Ian Brennan and Prayash Thapa and hardware specialist Justin Sinichko — and some tech from resin.io, python, and javascript we will walk through how to set up a server on the Pi that can access the camera, and explore all that the Pi Zero can do.

Building iOS & Android Apps with React Native

  • When: Sunday, March 11, 11:00AM - 2:00PM
  • Where:JW Marriot, Room 201-202, 110 E 2nd St

Using React Native, you can build native apps using the JavaScript language, workflow, and toolkit you already know and love. In this session, Viget's senior developers Eli Fatsi and Nate Hunzaker (with the help of Viget alumni Lawson Kurtz) will guide you through the development of iOS and Android apps using just your existing knowledge of JavaScript. First they’ll discuss the fundamentals of React and React Native. Then together you will build your very own native app(s). They'll cover everything: system setup, cross-platform code sharing, styling, built-in native UI elements and APIs, and more.

We hope to see you in Austin!

Fostering a Culture of User Research in Your Organization

$
0
0

Usability is central to the work of user experience design, which means that user research is central to our work as designers. At Viget, we've come to see research and design as inseparable. Yet it isn't enough to conduct research every now and then, when a client asks for it. What's needed is a culture of research, a shared habit of testing design assumptions with real people.

A few years ago, we realized that we weren't doing the research we needed to be doing, and had to change. This post describes our shift to become a more research-oriented group of designers. We’ve grown as design researchers since then and hope that what we’ve learned along the way can help you improve your process and convey the value of research to clients and coworkers. Here are some of those lessons.

1. Commit to making research a priority

For research to become integral to the way you work, it needs to be prioritized across your entire organization — not just within your design team. To that end, you should:

  • Identify and share achievable research goals. By identifying specific goals, you can share a clear message with the broader organization about what you’re after, how you can achieve those goals, and what success looks like. Early on, we shared our vision for research at Viget with everyone at the company, in particular talking with folks on the business development and project management teams about specific ways that they could help us achieve our goals. They often have the greatest impact on our ability to do more research on projects.
  • Track your progress. Once you’ve made research a priority, make sure to review your goals on an ongoing basis to ensure that you’re making progress and share your findings with the organization. Six months after the research group at Viget started working on our goals — things like learning new methodologies, discussing project management processes, and identifying ways to talk research with clients — we held a retrospective to figure out what was working and what wasn’t.

2. Educate your colleagues and clients

If you want people within your organization to get excited about doing more research, they need to understand what research means. To educate your colleagues and clients, you should:

  • Explain the fundamentals of research. If someone hasn't conducted research before, they may not be familiar or feel comfortable with the vernacular. Provide an overview of the fundamental terminology to establish a basic level of understanding. In Curt's post, Speaking the Same Language About Research, he outlines how we established a common vocabulary at Viget.
  • Help others understand the landscape of research methods. As designers, we feel comfortable talking about different methodologies and forget that that information will be new to many people. Look for opportunities to increase understanding by sharing what you know. At Viget, we go about this in a few ways. Internally, we give presentations to the company, organize group viewing sessions for webinars about user research, and lead focused workshops to help people put new skills into practice. Outside the company, we talk about our services and share knowledge through our blog posts and webinars (here's one about conducting user interviews from last November.)
  • Incorporate others into the research process. Don't just tell people what research is and why it's important — show them! Look for opportunities to bring more people into the research process. Invite people to observe sessions so they can experience research firsthand or have them take on the role of the notetaker. Another simple way to make people feel involved is to share findings on an ongoing basis rather than providing a report at the end of the process.

3. Broaden your perspective while refining your skill set

Our commitment to testing assumptions led us to challenge ourselves to do research on every project. While we're dogmatic about this goal, we're decidedly un-dogmatic about the form our research takes from one project to another. To pursue this goal, we seek to:

  • Expand our understanding. To instill a culture of research at Viget, we've found it necessary to question our assumptions about what research looks like. Books like Erika Hall’s Just Enough Research teach us the range of possible approaches for getting useful user input at any stage of a project, and at any scale. Reflect on any methodological biases that have become well-worn paths in your approach to research. Maybe your organization is meticulous about metrics and quantitative data, and could benefit from a series of qualitative studies. Maybe you have plenty of anecdotal and qualitative evidence about your product that could be better grounded in objective analysis. Aim to establish a balanced perspective on your product through a diverse set of research lenses, filling in gaps as you learn about new approaches.
  • Adjust our approach to project constraints. We've found that the only way to consistently incorporate research in our work is to adjust our approach to the context and constraints of any given project. Client expectations, project type, business goals, timelines, budget, and access to participants all influence the type, frequency, and output of our research. Iterative prototype testing of an email editor, for example, looks very different than post-launch qualitative studies for an editorial website. While some projects are research-intensive, short studies can also be worthwhile.
  • Reflect on successes and shortcomings. We have a longstanding practice of holding post-project team retrospectives to reflect on and document lessons for future work. Research has naturally come up in these conversations, and many of the things we've discussed you're reading right now. As an agency with a diverse set of clients, it's been important for us to understand what types of research work for what types of clients, and when. Make sure to take time to ask these questions after projects. Mid-project retrospectives can be beneficial, especially on long engagements, yet it's hard to see the forest when you're in the weeds.

4. Streamline qualitative research processes

Learning to be more efficient at planning, conducting, and analyzing research has helped us overturn the idea that some projects merit research while others don't. Remote moderated usability tests are one of our preferred methods, yet, in our experience, the biggest obstacle to incorporating these tests isn't the actual moderating or analyzing, but the overhead of acquiring and scheduling participants. While some agencies contract out the work of recruiting, we've found it less expensive and more reliable to collaborate with our clients to find the right people for our tests. That said, here are some recommendations for holding efficient qualitative tests:

  • Know your tools ahead of time. We use a number of tools to plan, schedule, annotate, and analyze qualitative tests (we're inveterate spreadsheet users). Learn your tools beforehand, especially if you're trying something new. Tools should fade into the background during tests, which Reframer does nicely.
  • Establish a recruiting process. When working with clients to find participants, we'll often provide an email template tailored to the project for them to send to existing or potential users of their product. This introductory email will contain a screener that asks a few project-related demographic or usage questions, and provides us with participant email addresses which we use to follow-up with a link to a scheduling tool. Once this process is established, the project manager will ensure that the UX designer on the team has a regular flow of participants. The recruiting process doesn't take care of itself – participants cancel, or reschedule, or sometimes don't respond at all – yet establishing an approach ahead of time allows you, the researcher, to focus on the research in the midst of the project.
  • Start recruiting early. Don't wait until you've finished writing a testing script to begin recruiting participants. Once you determine the aim and focal points of your study, recruit accordingly. Scripts can be revised and approved in the meantime.

5. Be proactive about making research happen

As a generalist design agency, we work with clients whose industries and products vary significantly. While some clients come to us with clear research priorities in mind, others treat it as an afterthought. Rare, however, is the client who is actively opposed to researching their product. More often than not, budget and timelines are the limiting factors. So we try not to make research an ordeal, but instead treat it as part of our normal process even if a client hasn't explicitly asked for it. Common-sense perspectives like Jakob Nielsen’s classic “Discount Usability for the Web” remind us that some research is always better than none, and that some can still be meaningfully pursued. We aren’t pushy about research, of course, but instead try to find a way to make it happen even when it hasn't been defined as a priority.


The tips above reflect some of the lessons we’ve learned at Viget as we’ve tried to improve our own process. We’d love to hear about approaches you’ve used as well.

Originally published on the Optimal Workshop design blog.

Getting Past Getting Started: A Developer Apprentice’s Story

$
0
0

When a field is always changing, and there’s always something new to learn, what does it take to go from apprentice developer to journeyman?

Questions like this have been at the back of my mind for the last few weeks, while I’m coding and in the times in between. Fortunately, this kind of thinking is encouraged during the Apprenticeship training program at Viget. Along with participating in the global curriculum and contributing to client work, the program's discipline-specific training portion has helped me gain new programming skills and a better understanding of what other skills I want to build.

On my second day at Viget, I received a copy of Edmund Lau’s The Effective Engineer, a book packed with lessons on how to learn and leverage one’s efforts at multiple career stages. By reading a few pages each night, I immediately picked up insights that shaped my approach to the apprenticeship. I’ve been more intentional and discerning about spending time on activities that will offer the best long-term benefits. My purpose in writing this article is to share ways that my first six weeks as an apprentice marked a shift in how I learned web app development.

Getting Started with Rails

To give some context, I never worked in Rails or Ruby before six months ago. I worked in science for over a decade. As a postdoc, I enjoyed using formulas in spreadsheets to streamline data analysis, and I dabbled a bit with running Perl scripts from the command line, but I wasn’t writing those scripts myself. I wasn’t doing any kind of computer programming until I decided to make a career change last summer. Like many coding bootcamp students, I started off learning fundamental front-end languages: HTML, CSS, and JavaScript.

The figure above was built using my own project data from GitHub, a site used to store project code in repositories. A single project can include multiple languages (indicated by colored dots) that line up vertically above the date when the project was last updated.

I built my first Rails app in September by following the steps outlined in the Rails Guides’ Getting Started tutorial. I made a few more apps after that and grew comfortable with MVC architecture - organizing an application into code for models, views, and controllers. However, I was getting by without understanding much about what was happening beneath the surface.

Being an apprentice at Viget has challenged me and given me the opportunity to dig deeper, giving me a better appreciation for all that Rails can do. At the beginning, I had a hard time understanding and extracting anything useful from the Rails API docs. Now, reading these same docs is an illuminating experience that helps me expand my toolkit. I’m getting better at seeing how to implement certain Rails conventions so Objects know just what they need and nothing more (Objects are a core concern in object-oriented programming). I am starting to identify places to use Plain Old Ruby Objects that fall outside of the MVC convention. I’m learning how to navigate these rough spots by mimicking solution patterns that have been used by others - both at Viget and in the broader Rails community. Importantly, I’m getting to see firsthand how a deep understanding of the entire Rails toolbox leads to better apps for Viget’s clients.

From StackOverflow U to Face Time with Mentors

The opportunity for mentorship is one of the best parts of being a Dev Apprentice at Viget. The face-to-face conversations about development challenges are a welcome departure from the long days I spent combing through Stack Overflow threads on my own. I used Stack Overflow so much in December that I earned a hat for visiting more than ten days in a row, “like clockwork.” (If you’d like to learn more about the site’s Winter Bash hats, here’s a great resource!)

As an apprentice, I meet with my official mentor at the beginning of each week to assess the past week and set new goals. He is available throughout the week when I have questions. Other Viget Devs have offered to schedule pair programming sessions with me and are open to spontaneous one-on-one sessions. We’ve discussed principles of object-oriented design and MVC architecture with direct application to problems I needed to solve. When I started to work on a client’s app for the first time, one Senior Dev walked me through the process of getting the client’s app running on my machine and took time for a more general chat about server configuration. After that, I was able to help resolve a routing bug and make display updates that the client requested.

I am still using StackOverflow, but I'm far less dependent on it because of the mentorship I’m receiving.

Scaling Up at a Steady Pace

When I started the apprenticeship, I knew I wanted to learn about web application development in a business-driven context, but I didn’t have a specific type of app in mind. I wanted to get a better sense for what kinds of apps clients asked for, and I was eager to learn more about what I didn’t know. The Dev team invited me to Viget’s internal #code-review Slack channel and gave me access to the GitHub repos so I could see the code that the team was working on. GitHub is a tool for maintaining and creating code with teams. Typically, a master branch is code that has been finalized for production; feature branches are used to build new features and will eventually be merged into a master branch. As I expected, client apps are much more complex than anything I previously encountered. The figure below depicts the complexity gap between apps I've worked on (represented in orange boxes on the left) and a Viget client app (the graphic that spans the full width).  

To get a feel for what Viget’s Developers were doing, I read code in pull requests shared in the #code-review Slack channel. A pull request (or PR) is a way of letting collaborators know that your feature branch code is nearly ready to merge into the master branch. I recognized some patterns but not enough to follow along with ease during my first week at Viget.

Fortunately, I was tasked with building a clone of the Hacker News site, which became a way to ramp-up my Rails skills and learn how the code-review process works at Viget. Previously, when I used GitHub for collaborative projects, my teammates and I would discuss pull requests offline. Being at Viget introduced me to how developers can use GitHub’s tools to embed conversations in between lines of code that are up for review in a PR. The PR code-review process has been one of the primary ways I’ve learned new Ruby methods and better ways to organize code during my apprenticeship. In addition to expanding my knowledge of Ruby on Rails, building my own app has let me safely experiment with gitrebase and learn how to configure a server for app deployment.

Having my own app meant I had specific problems I needed to solve, and this changed the way I looked at what the rest of the Dev team was doing. Instead of skimming their code without an anchor, I was looking at production-ready code with very specific questions in mind. I'd start to ask how Devs at Viget solved the same problems I needed to address myself. When I wanted to write specs for a complicated button display, I looked at a spec someone had talked about during stand-up (the daily morning meeting where all the Devs give an update on what they’re working on). After seeing a novel way that a Viget app renders modular components during a paired-programming session, I was inspired to develop Presenter objects to simplify view logic myself. When I got stuck because I couldn’t figure out the correct syntax to render a partial from my Presenter, another Dev showed me where it was done in a client app.

Using resources wisely

Another way I’ve grown as a developer since being at Viget is improving the way I source the resources I need. By resources, I’m referring to all of the following: documentation for Ruby gems (libraries that can be added to a Rails app to quickly introduce new functionality) and other tools I am using, online tutorials, and blog posts from other developers. Here are links to some examples:

Source docs, tutorials, and blog posts from other developers can all be invaluable resources. However, there are particular strengths and weaknesses associated with each format that I didn’t know about when I first started to write code. Further, some problems are shared by poor quality resources in all three categories, so there are few instances when you can be 100% sure that anyone else’s ‘recipe’ will solve all of your problems without some additional tweaking. After encountering and resolving challenges associated with each, I’m getting a better sense for some of the gotchas.


To wrap things up, the apprenticeship has certainly exposed me to web development in a business-driven context, as I hoped it would. I have seen developers at Viget move fast to meet tight deadlines, but I also hear those same people taking time to discuss app design and database organization, strategies that make an app better. I know I still have a ways to go before I’ll be as quick as I’d like to be, but I’m glad I’ve had so many strong role models to follow at such an early stage of my new career.


On View: Why Museums Need Brand Strategy

$
0
0

In 2000, the Tate Gallery (which encompasses the Tate Britain, Tate Modern, Tate Liverpool, and Tate St Ives) underwent a massive rebrand. It emerged sporting its now famous, mottled logo and the truncated name “Tate.”

Tate’s rebrand wasn’t just cosmetic. London-based agency Wolff Olins describes the work they did as “reinvent[ing] the idea of a gallery from a single, institutional view, to a branded collection of experiences.” The following year, Tate's overall annual visitor numbers rose 87% to 7.5 million, prompting the Observer to write that Tate "has changed the way that Britain sees art, and the way the world sees Britain."

Partnering with a branding agency worked for Tate, but what does that mean for other museums — institutions larger or smaller than Tate, with different audiences and different emphases? For many museums, branding might seem unnecessary to begin with. After all, you’re recognizable by the art on your walls, the airplanes suspended from the ceilings, or the fossilized dinos staring out of their cases. Who needs branding when you’ve got Dorothy’s ruby slippers?

Or perhaps there’s something about the notion of branding a museum that makes us a little uncomfortable. In his article in the Guardian, Robert Jones remarks: “For many, brand is a dark force bringing control, conformity, corporatism and crassness. It's the B word.” Museums are about art, science, history, and culture — they help us learn about ourselves. They’re not corporations.

Perhaps before we can move beyond the Mad Men stereotype, we need to define what branding really is. In the same article, Jones writes that “the term ‘brand’ is widely understood to mean much more than just a logo. It's seen as a fundamental, even radical shaper of what a museum does, as well as what it looks like.”

As brand strategists, we’re responsible for discovering and articulating who you are, what you do, and why. Done well, brand strategy tells the truth, the whole truth, and nothing but the truth. So help us, God.

And why is this important for museums? Because, for you, the truth is everything. You give your audience the opportunity to discover the truth, whether about a time period, a culture, or a person. The problem is that, too often, museums struggle to find the time and resources to answer the existential questions — what’s true about you? What problems do you face? How can you overcome them?

In her lecture for the Emerging Arts Leaders, Joan Cumming, Vice President of Marketing and Communication at the San Diego Symphony argues that institutions that deal directly with the community must pay particular attention to the truth when it comes to their core values. She draws a distinction between the mission statement trumpeted on a website, and the gut-level belief that drives an organization. To best serve its community, a museum must first ask: “why do we matter to the community?” In her article for the Institute of Museums and Library Services, Paula Gangopadhyay writes:

"Today, museums are adapting by being more cognizant, proactive, nimble and opportunistic, emerging as a force to reckon with. Every day we learn about museums who are going many steps beyond just being a resource or offering a space for a community gathering.” Every museum brings value to its community — but identifying that value can be difficult, and communicating it is even harder."

Brand strategy helps museums by asking hard questions, sniffing out core problems, and working to meet goals with creative solutions. Which leads us to the next question: once a brand strategy is created, what do you do with it? And why might a digital agency be the answer to that question?

For one thing, when you have a brand strategy, you want it to connect with people. You want it to be where they are...and people are on the web. Using a digital agency that relies on brand strategy allows you to bring a compelling message to a medium with a vast amount of potential. Digital agencies can not only help you hone what you’re saying, but also how and where you’re saying it — whether that’s by exploring mobile technology, developing a digital campaign, or creating interactive displays.

This doesn’t mean you won’t still use non-digital mediums. A good brand strategy should be able to thrive on and off the web — and the same goes for the agency you work with. For instance, we recently completed a brand strategy engagement with the Edgar Allan Poe Museum. The resulting strategy focused on the museum’s ability to make Poe’s imagination real to its visitors — and to spark their imagination in return. The strategy impacted social media, event marketing, and exhibit signage.

Now more than ever, museums have a great responsibility. We look to them to challenge us, inspire us, and help us distinguish truth from fiction. Museums will always be essential to our culture and our communities. But I think we all want to see their influence flourish, not simply survive. We want more people strolling into museums, and not strolling out until their feet are sore and their minds are stretched. The partnership between brand and digital allows museums to engage with their audience wherever they are — whether they’re sitting at home, wondering what to do with a sunny Saturday, or exploring the museum exhibits, Snapchat in hand.


Curious about bringing digital to the museum? Take a look at this post by Viget alum Samara Strauss.

Improve Project Communication With These Git Tips

$
0
0

Collaboration is a critical component of successful software development. While there are many opinions on how to build the best software, one decision is a given for most projects: using Git for version control.

The data in Git is critical to understanding how things change over time in a project. Is this work a feature or a bug fix? Does it resolve an open issue? Does it introduce a breaking change?

These days, Git extends beyond version control. Web services like GitHub provide tools for issue tracking, sprint planning, and more. In these integrations, Git data is a critical piece of digital project management. With that in mind, this article will share some tips to communicate effectively using Git.

In the following examples, I'll be referencing tie-ins with GitHub. Most concepts apply to services such as GitLab and Atlassian's Bitbucket.

Tip 1: Use Great Branch Names

$ git checkout -b login-page

When starting a new feature, naming the Git branch something relevant makes sense. But what if there is more than one active issue referencing the login page?

$ git checkout -b 4-login-page

Including the issue number in the branch name is one convention that communicates more without any extra effort. The reference makes it clear why this branch exists and provides more immediate context in any project branch cleanup that could occur weeks or months later (related tip: delete your merged branches ASAP). The exact convention is not as important as standardizing across the team.

Tip 2: Reference Issues in Commit Messages

$ git commit -m 'Add login page.'

Here's another easy win: always add #4 (or the pattern matching required for your issue tracker) to your commit messages.

$ git commit -m 'Add login page. #4'

This adds convenient context in only a few characters. Have look at GitHub's timeline to see what I mean:

By simply referencing the issue number, you've created a hyperlink to the issue for other GitHub users. Workflow bonus: automatically resolve an issue on merge with certain language patterns.

Tip 3: Write Descriptive Commit Messages

It's often helpful to outline details in a commit message beyond the "summary" first line, where characters are limited. When things get complicated, these longer notes can be invaluable to other developers. They are also great material for pull request descriptions and documentation.

If you're unsure about format, one common convention for multiline messages is the 50/72 rule. TLDR: use 50 characters for the summary, enter a new line, then wrap at 72 characters per line for the description text.

Note: I've used -m for simplicity in the examples so far, but I recommend using a text editor for multiline messages. There are a lot of Git GUI tools like GitX that are useful for staging and message writing. You can also double-quote your inline message, which allows new lines until the ending quote.

$ git commit -m "Add login page. #4>> Create new `/login` route, template.> Add rounded corners to text input.> > TODO: fix failing test."

Tip 4: Eliminate Extraneous Commits

$ git commit -m 'Add login page. #4'
$ git commit -m 'Login copy text typo.'
$ git commit -m 'Fix HTML indent.'
$ git push

There's a common need to add code that is only a small correction or amendment to the original commit. This can occur frequently during code review, where it results in a good feedback loop on pull requests.

Unfortunately, these kinds of additions are rarely meaningful to the overall project history. They are also more difficult to revert than a single commit. Here are a few popular methods to keep things nice and neat:

  • Update the most recent commit with git commit --amend
  • Interactive Rebase
  • Rebase and git commit --fixup. See Auto-squashing Git Commits from thoughtbot for more.
  • GitHub's "Squash and Merge" button for pull requests (option must be enabled in repo settings).

Using Interactive Rebase

$ git commit -m 'Add login page. #4'
$ git commit -m 'Login copy text typo.'
$ git commit -m 'Fix HTML indent.'
$ git rebase -i HEAD~3
$ git push

The code snippet above uses an interactive rebase to rewrite commits. If this is new to you, git rebase -i HEAD~3 launches something like this in a text editor:

pick 6dc980a Add login page. #4
pick 3253ac5 Login copy text typo.
pick 2d5a694 Fix HTML indent.

# Rebase 845e601..2d5a694 onto 845e601 (3 command(s))
#
# Commands:
# p, pick = use commit
# r, reword = use commit, but edit the commit message
# e, edit = use commit, but stop for amending
# s, squash = use commit, but meld into previous commit
# f, fixup = like "squash", but discard this commit's log message
# x, exec = run command (the rest of the line) using shell
#
# These lines can be re-ordered; they are executed from top to bottom.
#
# If you remove a line here THAT COMMIT WILL BE LOST.
#
# However, if you remove everything, the rebase will be aborted.
#
# Note that empty commits are commented out

This is the interactive part. You can choose what to do via text edits (pick, squash, etc.) based on the commented-out guide. Then save and exit to rewrite as specified. This method prunes quickly, but it also offers a lot of editing control of the commit messages you want to keep. See this in-depth interactive rebase post for more on the topic.

Caution: rebase rewrites history. This can be dangerous, i.e. losing work. If you're not comfortable yet, duplicate a Git branch (or create a test repo) and try it there!

Fin

I try to practice these simple tips every day. When in doubt, a little extra effort can go a long way towards helping a project run smoothly. Got your own Git project tips? Share with us below.

Running Hardware Hackathons

$
0
0

A while ago we ran the Pebble Rocks Boulder (PRB) hardware hackathon here in Boulder, Colorado. This was a 48 hour non-stop hackathon focused on the then freshly announced Pebble smart strap. Collectively the goal had been to bring together talented folks and technology in the hopes of generating a handful of clever ideas and projects. However after the dust settled, and the antics were over, what was created was far more than we had expected. We invited teams from around the nation to compete, but instead they ended up collaborating. Teams cannibalized a 3D printer farm, sprawled into one another's spaces, stayed up late debugging each others problems. As organizers we had unexpectedly stumbled into a world that could, in truth, only survive for two full days. It was a taste of festival life but without the extremes. Along the way we picked up some tips and tricks for running this sort of event, and we’d like to share those here in case you decided a hackathon may be a good idea.

What are hackathons really about?

Successful hackathons frame everything around participants. From the sponsors, to the venue, to the food, the participant experience is the primary consideration. This is the principle that flavors everything. And it should, in theory, make many decisions much easier. From the perspective of the event organizer it is helpful to pivot decisions around a goal… a simple goal you can carry in your back pocket and easily translate or reference. That first goal should obviously be to ensure participants walk away feeling spectacular. The second goal, in very close second, is to figure out everything else you care to walk away with. That might look like specific projects that do XYZ, or it may be a some level of publicity. Whatever it is, the second goal should support the first while also never trumping it.

Registration

We wanted to cultivate an atmosphere where eager individuals could move quickly and collaborate together on ideas. Knowing that hardware takes time, and forming teams can be difficult, we decided to invest time upfront and screen teams/individuals to only those we felt would work best together. We spent two weeks receiving and evaluating applications before extending invitations to those potential-participants we were most excited about. About ¾ of our invitations went to teams, while the remainder to individuals. Those that accepted were provided a registration form on Eventbrite and we charged a nominal ticket fee to ensure everyone would show up. Amazingly everyone, literally everyone, was able to self-organize and form or join teams before the hackathon. To facilitate we set up a Slack group for participants and invited everyone, instructed even, to make it happen. Everyone did -- that was a huge win.

Sponsor

Before Pebble was joined by the likes of Apple, and others, they were pioneers. They were trailblazing and igniting a fire along the way which naturally created a community of serious supporters. They had taken the crown, twice, on Kickstarter for wooing the masses and becoming the undeniable champions of wearable industry. They did it, in part, by building one of the most engaging developer communities. Who would want to participate in a Pebble Hackathon? Well the better question was who wouldn’t?

This should be the sponsor litmus test. If a hackathon needs a major title sponsor at least find one everyone can rally around. This will help keep the event battles focused on logistics. It can be a nightmare trying to organize an event that is uncomfortably trying to sell participants on a brand. Imagine a Facebook sponsored farmers market. It’s that sort of thing. It’s just no good.

Tools

Hardware hackathons are known for their real-world fabrication component. And one of the easiest steps off the screen (familiar ground) is into embedded electronics. What we appreciate most about this electrical component is the animating life and technical depth it can give projects. However, supporting this type of creativity isn’t easy. First off, unlike software, hardware creatively heavily depends on the tools and resources available during the hackathon! Therefore it is prudent for all hardware hackathons to be outfitted with a fully stocked electronics lab. No exceptions.

A dedicated electronics lab empowers teams to do everything from pull apart boards to fabricate wiring harnesses. During PRB we even had a team show up with their own reflow iron! We were certainly glad (for the venue’s sake) there was a dedicated workbench (albeit tucked into a corner near a window) to use it on.

Food

The food thing should be taken seriously. This is doubly true for events that push through the night and stretch for up to 48 hours. At this scale the food logistics are about as important as everything else. For PRB we spent a considerable amount of time sourcing meals and snacks because we wanted to encourage participants to stay together and not disband for meals. It’s a convenience thing as much as it is a safeguard against attrition. A loss of steam = a loss of motivation, especially when projects hit a snag or are not going well. Food sounds the trumpets and rallies the troops.

To make our lives easier we asked about the unique dietary needs of every participant. This wasn’t hard, we just spun up a Google Form and took a survey. We took this knowledge and shopped it around the kitchens and caterers we felt would be enthusiastic about partnering. We wanted tasty local food that would showcase Boulder. And, pleasantly, we found great options all within about two blocks of the venue. These kitchens were all eager to lend us their excess capacity between meals and we were happy to pay a fair price.

Between meals we worked just as hard to keep a stocked supply of local beer, grocery fruit, generic snacks, coffee, and natural energy drinks. This certainly didn’t stop folks from leaving the venue for meals, and we didn’t want to STOP them, but it did present an option that 95% found favorable to everything else.

Documentation

It is important to find ways of cataloging hackathon projects. It is both a good way to preserve momentos from the event as well as an incredibly useful repository of information that can be shared around online. One of the goals of PRB was to shout from atop a mountain that the new Smart Strap SDK was open for hacking. To facilitate this public announcement, and lend some voices to the effort, we asked all of the teams to use Hackster as their platform for documenting projects.

Of course we knew that this request was a tall order. Everyone can agree that documentation isn’t exactly a top priority during a sprint event. So something we tried, and something we thought was very successful, was hiring a professional photographer to roam around and help capture team moments. To bring focus to the actual projects we also created a temporary photo studio at the hackathon. The studio was simple but complete. It featured a backdrop and multiple lights, all of which enabled teams to capture great images of their hard work. These small efforts breathed life into the documentation effort and combined to add a bit of polish and energy to the Hackster projets. Those projects can still be found online!

Judging

At long last hackathons come to a close and, like every good endurance sport, they culminate with some time on a podium. This final judgement is a great way to give teams a chance to share the fruits of their labor while also specifically acknowledging stand-out performances. For PRB we enlisted the help of local hardware entrepreneurs, engineering professionals, and creatives to provide a well-rounded and *fingers crossed* unbiased perspective. We blocked out time for everyone to roam around and visit with one another’s project. During this period judges also met with teams and interacted with their projects. The judge’s objective was to settle on those teams which were most deserving of a variety of prize buckets. Finally, PRB crowned the event with an awards presentation and a final slideshow documenting 48 hours of antics. If you do a slideshow, be sure to feature everyone at least once.

Final Thoughts

Hardware hackathons are a unique beast. They share many of the challenges typical hackathons face in addition to many others not mentioned here. Other considerations range from the proximity of the nearest shower to the bandwidth of the venue’s internet. Will you need a first aid station? Most definitely. All of these aspects add up to be a significant effort and, frankly, a bit of a logistical nightmare at times. That’s why it’s nice to take a principled approach to these things. In our experience the best thing to bank on is putting the participant’s experience at the center of every consideration. Everything else will work out.

What Are Viget Developers Building Right Now?

$
0
0

I sat down with our Development Director, David, last week to talk about Viget’s Development team, what they are working on, and how we should grow over the next 6 months. I left the conversation inspired.

The purpose of this article is to provide a snapshot of what the Viget Dev team is currently working on. Hopefully, you’ll find this list as inspiring as I did -- there is a huge range of scope, duration, team size, technology, and client type. If you think you’d enjoy contributing to these types of projects, I hope you’ll consider applying to work with us or at least introducing yourself so we can keep in touch long-term.

Here’s a quick rundown of the dev work we’ve done this quarter (January - March, 2018).

  1. We just started a quick, two-week project to build a small app with a React front-end and Rails back-end. It’s a fast paced, collaborative project with two Devs and a UX Designer. This is part of an ongoing engagement we have with a tech-focused venture capital firm. The developers on this project have been writing Go, React, and Ruby.
  2. We’re currently adding a new product to the custom content management and e-commerce platform we built previously for Wildlife Conservation Society (WCS). This is a multi-year relationship, and the Viget team has spanned all disciplines (design, UX, data, backend dev, front-end dev). The developers on this project are writing Ruby.
  3. We recently completed what we affectionately called the “4 weeks, 3 apps” project. Working closely with a Y-Combinator funded start-up, we built a set of apps that redefine in-store shopping. The client team brought machine learning expertise, and we brought web / mobile development expertise. The Viget team included four developers and one product designer. Among other things, they used React Native with custom Java code to do some native integration with Square. This project was exciting, energizing, and -- let’s be honest -- exhausting. (In a good way!)
  4. We are working with long-time client Privia Medical Group on several virtual visit and virtual urgent care initiatives launching in 2018. The initial web app version of this software was built with a React front-end and a Ruby on Rails backend, with Vidyo powering the video conferencing. Now, a team of three Viget developers + three client developers are tackling an Electron desktop app for doctors, as well as iOS and Android native mobile versions for patients, which means Nate gets to use Kotlin. He is very excited about that.
  5. Long-time client US News has a ton of cool data, and we’ve worked with them to build beautiful, easy to use web front-ends to share that data with readers.  Most recently, we’ve been helping to build one of their “Best Of” sites. The developers on this work are writing React and Python.
  6. We’re working on a content and e-commerce site for a large medical supply company. The client was enthusiastic about using Craft, but also required some custom features. Working closely with our product and visual designers, we have a front-end developer building this site with Craft and a back-end developer writing custom Craft plug-ins in PHP.
  7. A forward-thinking investment strategy firm hired us to overhaul the way they provide information to the global investment community. We created several interactive data visualization dashboards, including this one that displays historical and expected returns of simulated portfolios based on different investment methodologies. The team has been doing this work in React.
  8. We recently wrapped our first project with the Cradle to Cradle Products Innovation Institute,  a non-profit that empowers consumer product manufacturers to have a positive impact on the environment. We built a pathway tool for early-stage material health innovators, which has an Elixir backend and React front-end, to give users the ability to create an inventory of chemicals and screen them against lists of known hazards in a 3rd-party database. Looking ahead, we’ll be building out their suite of consumer and internal-facing tools, mostly in Elixir.
  9. Internally, we've invested a big chunk of time this quarter on expanding our DevOps expertise. We're putting processes in place to better provision, configure, manage, and troubleshoot servers for our clients. Using Ansible, we're building a set of tools to more easily configure servers and to provide clients with their infrastructure as a code deliverable. Our most recent DevOps challenge is working with a Windows-only client team to use the Windows Subsystem for Linux and a custom Ansible-based tool to automatically configure a development environment so they can develop a Rails application on their Windows machines.


The next three months (and beyond!) are shaping up to be as busy, varied, and challenging as the last three, which is why we are looking to grow the team. We’re hoping to hear from people who love not only building software, but learning new languages, and sharing their knowledge along the way.

I’d love to tell you more about these projects and how our dev team collaborates with the other disciplines at Viget. Please don't hesitate to get in touch!

Values of the Viget Dev Team

$
0
0

Every 6 months, the development team here at Viget gathers in some remote location to ensure our ship is heading the right direction. The tradition began nearly 7 years ago, and through all of the team's highs and lows, our bi-annual offsite has always been a consistent source of positivity. It has served as one of the most valuable facets of being a member of this team.

There are a number of activities we run through as a group, and most recently, we spent a few minutes assembling our thoughts around the core values underlying our team. Everyone took five minutes, a couple of Post-It notes, and came up with their top three. We threw the batch on the wall and then mostly nodded our heads collectively.

dev-values

To very little surprise, there were similarities all over the place. I'll touch on some of the high level themes that ran through the group's results.

Quality

"High quality code", "well-tested code", "quality work", "writing good software". We value and expect quality work out of everyone on our team. This perpetual desire for quality is one of the reasons we feel good about the work that we're doing. It gives more junior members goals to strive towards, and it keeps the flame lit for our senior members to stay sharp. As the industry changes and technologies fade in and out of the limelight, our foundation of critical thinking and quality development ensures we're always able to provide top-notch services to our clients.

Cultivating knowledge

"Support one another", "teaching/learning", "learning/collaborating", "inner-team support", "sharing mistakes", "working together". Behind quality, supporting each other professionally took the most votes. I personally have benefited immensely from this team value as Viget has fostered the vast majority of my professional career. Now, as a senior member of the team, I look forward to bringing up and working closely with my peers in the pursuit of, you guessed it, quality.

People

"Being good people", "be useful", "honesty", "being respectful". No one likes working with a bunch of jerks, and being a team of mostly introverted developers who all think typing away in a lonely room for hours at a time is a decent way to spend a day, the stereotype is certainly there to shake. We like to think that our people skills are up there with our technical ones, however, and aim to foster a positive culture to work with and within.

So...

There's the Viget dev team in a nutshell. Sound like a place you think you would thrive in? We're always on the lookout for Viget's next great developer.

Viewing all 935 articles
Browse latest View live